I’m so excited to be sharing a few of my favorite new Wilton cupcake products with you guys this week, and even giving them all away to one of you! Don’t worry if you missed that post you still have time to enter! You can get in on the fun till Friday April, 19th here.

Today I’m starting out with the Colorburst Batter Bits – aka the BFF of sprinkles :) Out of all the new products I was most curious about these and I couldn’t wait to try them. I had the same question that you guys most likely do: What makes them any different then sprinkles? I started out by baking them in cake batter as they were meant to be used, spoiler alert: they worked great. (I’ll share those with you in the next post) Then I decided to use them in a different way to see how versatile they could be. Which gave me the perfect opportunity to finally try out some birthday cake cookies!


So what exactly do the Colorburst Batter Bits do and why are they any different then sprinkles? As they melt in the oven the color is absorbed in the surrounding cake batter (or in this case dough) which of course, colors the batter leaving pretty spots of color throughout your cake – confetti cake. And they come in six different colors, so you can match them to a certain color or mix them up. Sprinkles can create the same effect, however, sprinkles don’t absorb into the cake same way and sometimes they don’t really melt at all which won’t look as nice and can even leave a crunch to it, and sometimes burn -ew. These Batter Bits can give you the bright specs of cheery color you want inside your cake, allowing you to turn anything and any flavor into “confetti cake” while letting the sprinkles do their job outside the cake. Because there must always be sprinkles :).

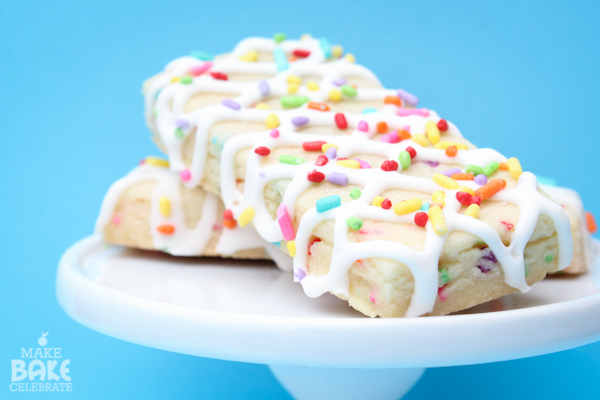
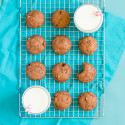
Let’s move on to the cookies. Oh man, these cookies. I’m not sure if I’m mad at myself for waiting so long to attempt these…or mad at myself for making them. I love birthday cake flavored treats, and these were no disappointment! My kitchen smelled like sweet buttery cake the entire time I was making them, and they tasted just like it too. No to mention the dough was easy to work with and the cookies baked beautifully. I decided to turn these into “cookie sticks” by cutting them into thin long rectangles and then drizzling them in royal icing and dressing them up in sprinkles. The Colorburst Batter Bits made perfect little specs of color on the inside, just like a confetti cake!
Here’s what you will need:
2.5 Cups Yellow Cake Mix
2-3 Cups Flour
3/4 Cup Sugar
1 Cup Unsalted Butter
1 TBS Butter Extract
1 Egg
Colorburst Batter Bits
1 cup Royal icing (approx.) OR Wilton’s Cookie Icing
Sprinkles To Decorate
Makes approx.: 24 1.5in X 3in cookies.
I tried several different cake mixes and Duncan Hines yellow cake mix produced the best tasting and working dough. Even better was this smaller yellow cupcake mix from Duncan Hines, which was the perfect amount of cake mix!

Here’s what the Batter Bits look like…all mixed up and ready to go!

Step 1: In a separate mixing bowl mix together 2 cups of flour and cake mix.
Step 2: In a large mixing bowl, or the bowl of an electric mixer, beat together the unsalted butter and sugar until combined well. Add in egg and mix again. Add in butter extract and beat until all is combined well.
Step 3: Slowly add in flour/cake mixture. The dough will start off looking very dry and in pieces, slowly it will mix together and combined into nice smooth dough, gathered into the center.
Step 4: Pour the dough out onto a clean counter and work it all together into once nice smooth piece of dough. If your dough still feels pretty sticky, go ahead and work in the last 1/2 cup of flour. (Depending on the brand I sometimes needed it)

Step 5: Spread your Colorburst Batter Bits out on the counter. I started with about 2 TBS then slowly added more until I thought it was “about right”.
Step 6: Once you have your batter bits worked in nicely, wrap your dough in plastic wrap and let chill in the fridge for 20 minutes.

Step 7: Using two lightly dusted pieces of wax paper and a rolling pin, roll your dough out. If you would like more info on how I get mine even etc check out Rolled Cookies 101.

Step 8: Cut your cookies out. I made mine into cute little cookie sticks about 1.5in X 3in, feel free to cut them however you would like!

Step 9: Place on parchment paper lined baking sheet and place in freezer for 2 minutes. (this will help them keep their shape)
Step 10: Bake at 350 degrees for 10 minutes (or until slightly golden at the edges). Let cool.

Step 11: Once cool place a piece of wax paper under the cooling wrack and drizzle with royal icing and sprinkles.
I used a half batch of my royal icing (2 cups powdered sugar, 2 TBS meringue, 3 TBS warm water) then thinned with warm drops of water to a flooding consistency and placed in a decorating bottle. If you have never used Royal icing or want an easy route, Wilton makes a great cookie icing ready to go in a bottle that would work perfect. You can find it just about anywhere you can find Wilton products.

Now just let them dry for a few hours and your all set! These cookies stayed fresh for several days in an airtight container, and they also freeze well!

I think these would be just adorable packaged up cute to share with somebody on their special day. Or just because it’s Monday…yea I kinda love these cookies. :)


Don’t forget, you can enter for a chance to win one of every color Colorburst Batter Bits as well as other fun new Wilton items here! I can’t wait to show you what else I’m been up to with them :).

Ingredients
- 2.5 Cups Yellow Cake Mix
- 2-3 Cups Flour
- 3/4 Cup Sugar
- 1 Cup Unsalted Butter
- 1 TBS Butter Extract
- 1 Egg
- Colorburst Batter Bits
- 1 cup Royal icing (approx.) OR Wilton’s Cookie Icing
- Sprinkles To Decorate
- Makes approx.: 24 1inX3in cookies.
Instructions
- In a separate mixing bowl mix together 2 cups of flour and cake mix.
- In a large mixing bowl, or the bowl of an electric mixer, beat together the unsalted butter and sugar until combined well. Add in egg and mix again. Add in butter extract and beat until all is combined well.
- Slowly add in flour/cake mixture. The dough will start off looking very dry and in pieces, slowly it will mix together and combined into nice smooth dough, gathered into the center.
- Pour the dough out onto a clean counter and work it all together into once nice smooth piece of dough. If your dough still feels pretty sticky, go ahead and work in the last 1/2 cup of flour. (this will depend on cake mix brand)
- Spread some of your Colorburst Batter Bits out on the counter, slowly add more till it's right for you.
- Once you have your batter bits worked in nicely, wrap your dough in plastic wrap and let chill in the fridge for 20 minutes.
- Using two lightly dusted pieces of wax paper and a rolling pin, roll your dough out.
- Cut your dough into small little bars, about 1.5inX3in. OR into another shape you would like.
- Place on parchment paper lined baking sheet and place in freezer for 2 minutes. (this will help them keep their shape)
- Bake at 350 degrees for 10 minutes (or until slightly golden at the edges). Let cool.
- Once cool place a piece of wax paper under the cooling wrack and drizzle with royal icing and sprinkles. Let dry for a few hours.








What a super cute treat… everything is better with sprinkles! I have been wondering about this new product by Wilton. Thanks for the review! Did the color “burst” just as much in these cookies as they did in your cake?
These cookie bars are so cute and fun!
I can’t wait to try this recipe.
These cuties definitely say party!
What a fun, cute treat!
How cute and perfect are these, Toni?! I’m in LOVE!!
Thanks Hayley!
I would love to know where you got the sprinkles on top! What a great color combo, and I love that there aren’t white sprinkles mixed in. Where did they come from? Or did you have individual colors that you mixed together?
I get all of my sprinkles in bulk at Country Sweetart Kitchen. (they have an online store) Then I just mix as I need! Hope that helps. :)
These are so cute! I wondered about the color though, mine turned a little yellow from either the cake mix or the butter. Any suggestion on how to get them looking so white like yours?
How did u get them to keep shape ? I baked mine & they flattened…..(I used Duncan Hines lemon cake to try out “lemon cookie bars”)
Did you make sure to place them in the freezer before baking (step: 9)? This always helps my cookies keep their shape. Also, I like to keep my dough nice and cool so if I’ve warmed it up too much with my hands I place the dough back in the fridge to chill. Although I can’t say I’ve ever tried lemon cake mix to know for sure! :)