

It’s true, April showers bring May flowers! Unless you live in the desert and you haven’t seen rain but once in six months, then you bake some sugar cookie flowers! Plus as I’ve said 100 times…the only green thumb I have comes from food coloring. So even if we weren’t currently living in the desert, growing them isn’t quite an option! My lack of green thumb aside, I’m pretty freaking excited to share with you guys something new I dreamed up, how to make cookie bouquets 3D!
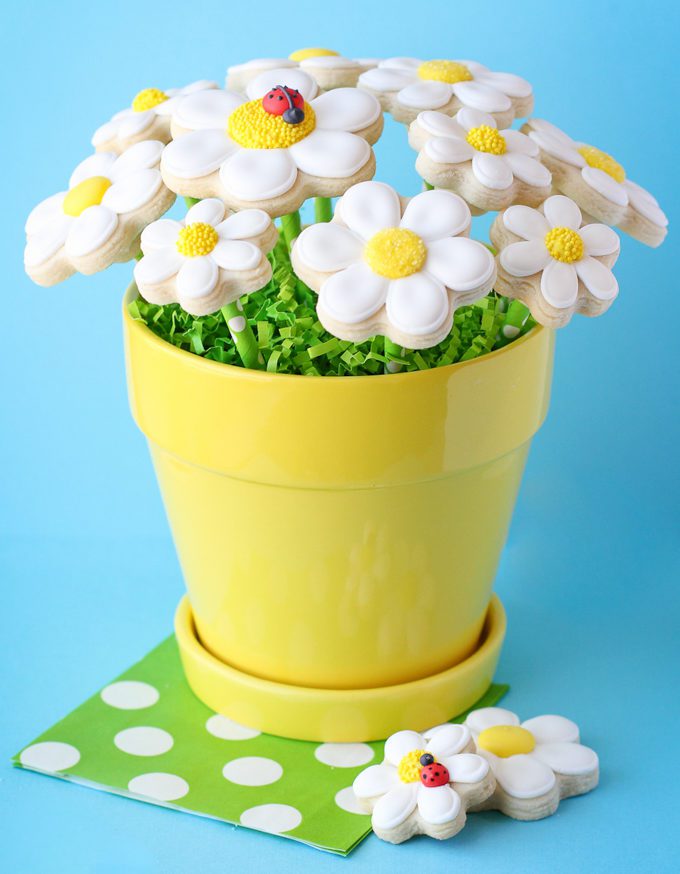
I knew I wanted to create a cookie bouquet this year but I wanted to try something a little different. Normally when you see cookie bouquets the sugar cookies are baked on to a stick from the back and the cookies are all facing one way. This time I wanted to try to create a cookie bouquet that actually had flowers coming from “stems” that would lay like a real flower. Turns out, with a little creativity it wasn’t very hard at all! Sure, it takes a few extra steps and a little more time but these cookies are certainly not very hard to make, and you won’t even have to water them!
These little guys were the key to my cookie bouquets! After rolling and cutting out my cookie flowers I used the extra dough to create little edible “stem supports” for the cookies. I started by cutting out small circles about 1/2in wide. Then I laid the cut circles on a parchment paper lined cookie sheet and used my lollipop stick to create a hole all the way through the little cookie, then baked for 8-9 minutes. As soon as they came out of the oven, leaving them on the pan and warm, I pushed my sticks through each hole again to make sure they would still fit. Then I let them completely cool on the pan, you want them to be firm little cookie bits.
For the sugar cookies I used my go to rolled sugar cookie recipe and method that you can find here, and three of the smallest cutters from my flower set I picked up at Wal-Mart for $2.88. I baked each cookie about 1 minute longer than I normally would make them a little firming knowing they had to “stand up” for the cookie bouquets.
*UPDATE* The instructions are still listed below however I have step by step pictures available on this updated cookie bouquets post.
HOW TO MAKE 3D COOKIE BOUQUETS
NEW TO COOKIES? BE SURE TO CHECK OUT THESE POSTS FOR THE BASICS:
ROLLED COOKIES 101 + ROYAL ICING 101
TOOLS
- daisy cookie cutter
- small circle cutter
- piping bags
- #2 tips
- icing bottles
- pot or bucket + filler (rice, beans, dry corn, styrofoam, glass pebbles)
SUPPLIES
- white outline icing + white 20 second icing
- yellow premade icing (or yellow 20-second icing and yellow sprinkles)
- 6in lollipop sticks
- green paper straws
COLORS
- yellow – AmeriColor Electric Yellow
Step 1: To make these daisy cookies super easy I suggest making the flower centers a day or two ahead of time. This way you can simply drop the centers on to the white icing, making these cookies the easiest ever. Every time I have extra yellow icing I make extra centers. To make them simply pipe little mounds of yellow 20-second icing onto a parchment paper lined baking sheet and then immediately cover with sprinkles if you would like. I only pipe and cover one row at a time if I am sprinkling them because they crust over quickly. Let them sit for a full day then you can pull them right off the paper, pour your sprinkles back in the container, and store the centers airtight for a year!
If you can not make the centers ahead of time simply follow the same steps to ice the cookies then once the white icing is dry pipe a yellow center on with 20-second icing, cover entire center with sprinkles (if desired) then let dry. Once the yellow is semi-dry (about an hour or two) gently shake off sprinkles and place back in container.
Of course the lady bugs are optional but if you would like them you will need to make them a day in advance too. I made mine with leftover red and black piping and flood icing. To make them pipe red dots on to a wax paper lined baking sheet, then pipe smaller black circles on one side for the head. Once they have crusted over pipe on little dots OR let them dry all the way and draw them on with a black marker.
Step 2: Using a toothpick mark a little spot in the center of the cookie, this will be your guide point for the petals.
Step 3: Using piping icing and a #2 tip pipe petals starting and ending at your center point each time.
Step 4: Fill petals with white 20-second icing. Use toothpick the pull the icing into the center points if needed. Immediately drop flower centers on to wet icing. If you made any little ladybugs you can drop those on now too!
Step 5: After the daisy cookies have dried preferably overnight, gently pick them up and glue your little cookie “stem supports” on using white 20-second icing.
Step 6: Turn the cookie back over and let dry for 1-4 hours depending on how much time you have.
Step 7: Once the “stem support” has dried flip the cookie back over and gently put the stick in and gently twist until you get a snug fit. What your doing is making sure the icing didn’t drip down the hole if so you want to push the stick back up to the bottom of the cookie to get a good hold. Take the stick back out and place a drop of icing in the hole, then gently push the stick back into the top.
Step 8: If your daisy cookies are totally dry you can place them upside down on the cookie tray to dry. If they are not all the way firm, slowly turn the cookie over and place it in a cake pop holder or a piece of styrofoam and let it dry for several hours.
Step 9: To make my stems actually green I trimmed up some green paper straws and slipped them over the stick.
Step 10: To complete your cookie bouquets place cookies in a pot with rice, beans, corn, sprinkles, or even styrofoam. Then cover with green “grass” or tissue paper. I like to use rice for projects like this because it gives me the versatility of moving them around nicely, however, if you are giving this as a gift you may want to consider styrofoam or at least let your hostess know its full of rice…just in case.
Whew. I know, that was a lot of reading. Even though it looks like a lot of steps it’s really pretty simple. Even if your brand new to cookie decorating, don’t be afraid to give these a try! You won’t regret it!
I just love how these daisies turned out! Wouldn’t they make the perfect Mother’s day gift? She can have her flowers <em>and</em> eat them too!
WANNA CHECK OUT MORE 3D COOKIE BOUQUETS?
Heads up! To keep those legal gurus of the world happy, I need to inform you that some of the links in this post are affiliate links. In short – I may earn a small commission from the use of said link with no cost to you! But don’t worry I only link to stuff I use, love, and know you will too!


