

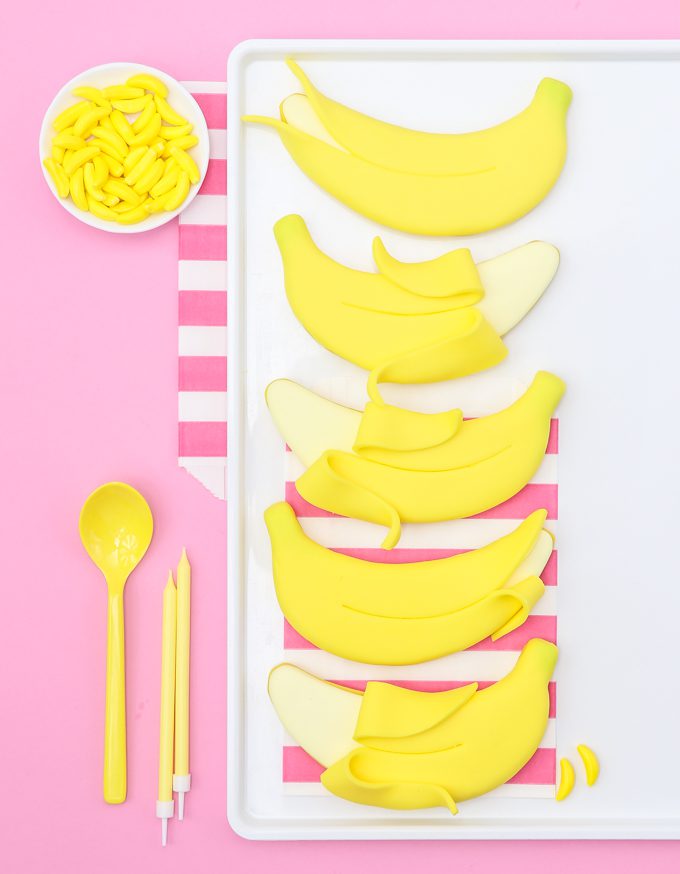
I am super crazy pumped…no I’m BANANAS about bringing you guys this fresh (and hopefully ripe) content today! Of course, I’m talking about these totally a-peel-ing Banana Sugar Cookies. And guess what, they are hand cut!
Why am I so pumped? Well, lets start with the obvious…with this combo of royal icing + fondant + cute message, I just know you’re going to find the post totally A-PEELING! And aside from the cuteness, I am bringing a whole new concept + brand, to the blog which I have not shared ever before. Today I’m going to be starting one of the many posts in which I will be highlighting a brand I totally love and use in my baking, all. the. time. Silhouette! For most of you, this brand doesn’t need an intro because they are just that awesome. But in case you’re not a fan yet, Silhouette is a brand of personal cutting machines + coordinating materials. Their stuff is SO awesome. You can cut out just about anything, and I mean anything with their machine + digital design studio.
Most people would not think of this as a brand used in baking + decorating but let me tell you they would be wrong! For years I have been using my beloved Silhouette portrait to create items that help decorate my sweet treats and I’ve always wanted to bring these ideas to the blog, it’s finally happening! I’ve used my Portrait machine to make cake toppers, cupcake toppers, cake banners, cupcake wrappers, confetti, cookie stencils and SO much more. I’ve even used their awesomeness to help me make treat boxes and tags to package the treats. Seriously, guys, these posts are WAY overdue.
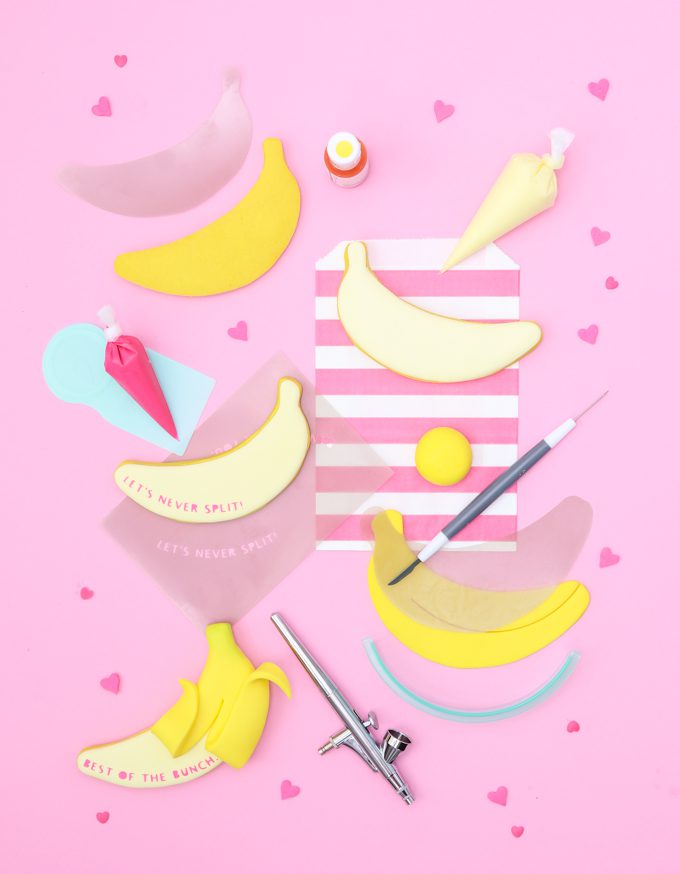
Recently I’ve really been giving these products a new test by using their Stencil Material to create text on my cookies. When Silhouette sent me more stencil material I was so excited to make more! I’ve been going through a lot of stencil material! I love the clean well-polished look you get with a stencil and since I’m making them right at home…I can make it, ANY WAY I WANT IT! For these cookies though I took it one step further to show you guys just how much I really love these items. What would you do if I told you these banana cookies were hand cut. Yep, as in no cookie cutter…at all. Just me and a stencil I made using my Silhouette Portrait.
I knew I wanted to make banana sugar cookies this year for Valentine’s Day, because let’s face it the funny content is ripe for the taking. But wouldn’t you know no matter how I tried I couldn’t make a banana in the shape I wanted with any of my cookie cutters. Even if I did find the cutter I needed I knew I would need the peel to be slightly larger than the cookie. That’s when my Silhouette Portrait + stencil material came into play YAY! I simply searched the silhouette store for a banana file, where I found this one for .99. I sized the banana to the exact size I wanted it then cut it out using my Portrait. Once I was done with the cookie stencil I then made another banana just slightly larger to cut the fondant with. And then some sayings to stencil on to the banana. This process is so easy to do in the design studio.
DECORATOR’S NOTE! As always you can add or adjust tools and supplies to fit your ideal end result or tools you already have. But here’s what I used. Also, all of these royal icings could easily be switched to 20-second icing. I am just so darn old school I love to pipe and flood.
SUPPLIES
- banana sugar cookie dough dyed yellow (recipe below)
- light yellow 20-second icing
- yellow fondant
- pink stiff icing (slightly more stiff then outline icing)
- green airbrush (optional)
TOOLS
- parchment paper
- small banana stencil
- large banana stencil
- sharp knife
- rotary cutter
- piping bag
- small round piping tip
- pun stencil
- icing scraper
MAKE BANANA COOKIES
Step 1: Using your Silhouette machine cute a banana + banana peel stencil. Cut cute little saying if you would like to add those.
Step 2: Make banana sugar cookie dough, by adding banana extract to your favorite sugar cookie. I added 2 tsp of banana extract to this recipe. Dye yellow with yellow gel color.
MAKE BANANA SUGAR COOKIES
Step 3: Using a sheet of parchment paper cut no bigger than your pan, roll out your yellow cookie dough. Place the entire rolled sheet of dough on your baking pan and into the freezer. If you have more dough then your cookie sheet cut off the extra and roll that out on a second parchment sheet. You want your dough to be pretty firm but not frozen solid to where you can’t glide a knife through.
Step 4: Use your small banana stencil to lay on top of the dough and cut around it as smooth as possible using a sharp knife. You can cut your bananas out right next to each other. After all the bananas have been cut peel away the outside dough and space out your bananas 1.5 – 2 inches apart. You may need a second baking sheet. If you have any rough edges you can take a clean finger and gently smooth out the dough edges. Bake the bananas for 10-12 minutes at 375. While your first banana are baking repeat these first two steps with any remaining dough to make more bananas.
DECORATE BANANA COOKIES
Step 4. Once your bananas have totally cooled you can frost them with your 20 second light yellow royal icing then let them dry overnight.
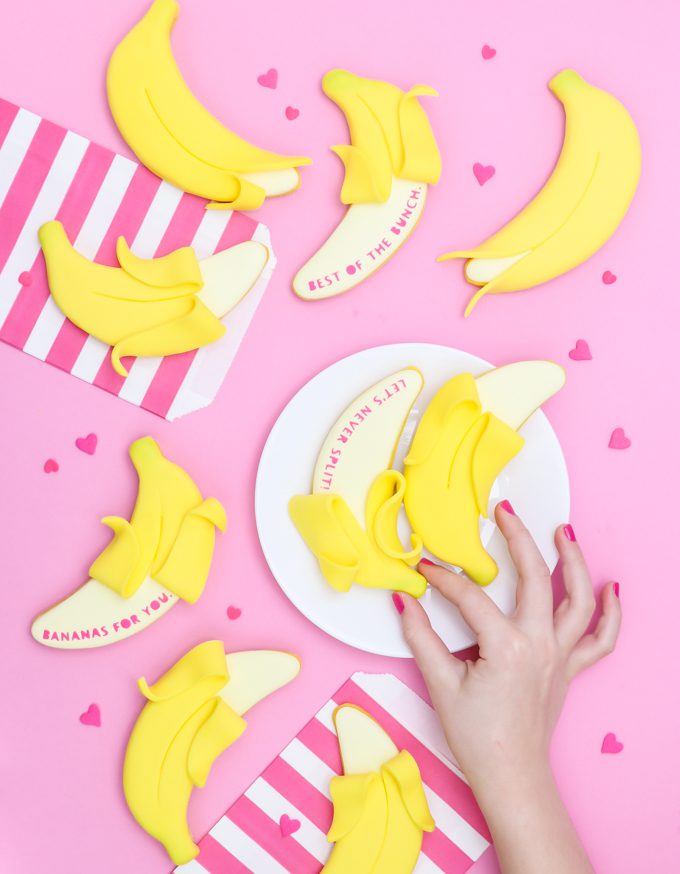
Step 5. Use the stencils provided, a scraper tool or small spatula, and a stiff pink icing to put the fun little puns on the bananas. If you are new to the stencil game I highly recommend checking out this stencil holder, I love it! However, a set of magnets below and above the stencil on a cookie tray hold everything into place really well. Use the scraper tool and scrape a small amount of icing over the lettering until smooth. Gently lift the stencil up. The words will be completely dry in about 15 minutes.
Step 5. Cut your banana peels out of rolled yellow fondant using the larger banana stencil plus knife. You will also want to cut the peel down the middle. I like to cut about 4 at a time and let the fondant sit for a few minutes so it’s not quite so soft before moving it on to the cookie. When you’re ready lay the peel on the banana starting with the not split end. Gently press the fondant down around the cookie and continue to work your way up the sides. When you’ve got to the point you want the banana peeled back peel the fondant back and gently shape it into place. If for any reason the fondant doesn’t want to stick on its own to the cookie edges you can always use a little water/piping gel/or watered down fondant as “glue”.
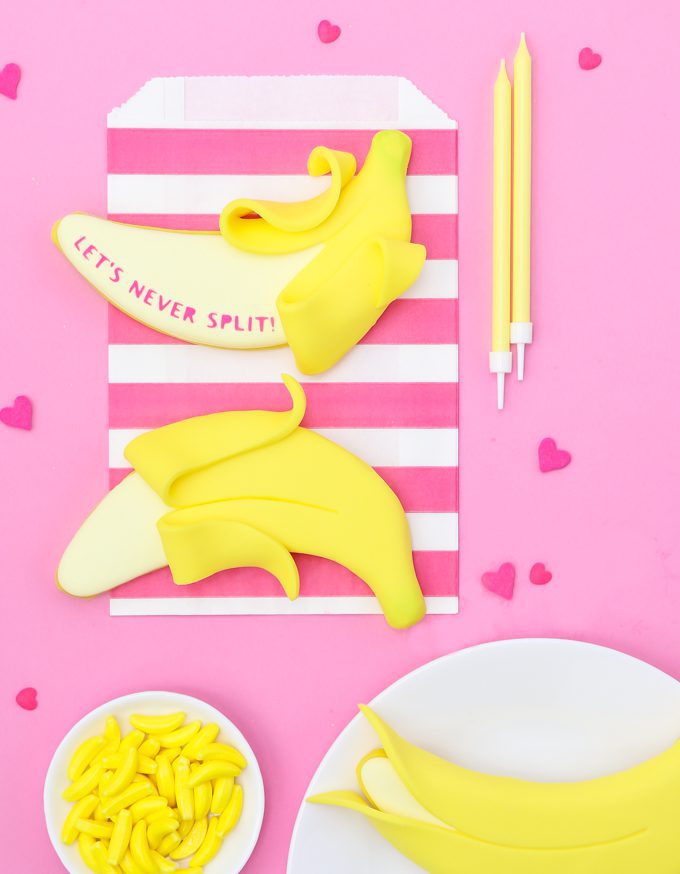
And now you have the cutest banana sugar cookies your Valentines could ever ask for, they will never wanna split with it! I can’t wait to bring you guys more stenciled treats, and soon Stenciling 101! What do you guys think about hand cutting cookies? With 1000’s of designs in the Silhouette store I’m currently dreaming of endless designs…
Heads up! To keep those legal gurus of the world happy, I need to inform you that some of the links in this post are affiliate links. In short – I may earn a small commission from the use of said link with no cost to you! But don’t worry I only link to stuff I use, love, and know you will too!
I was also provided material for this post, however, the content, process, and ideas are all my own.


